Data Prep
Data Prep builds prepared tables: clean, typed, deduplicated tables that Zeotap creates and maintains in your own warehouse, from raw data that is not yet shaped for modelling. A Model then reads a prepared table as a plain table, and everything downstream — audiences, reverse ETL, orchestrations, identity — works as it always has.
Data Prep is enabled per workspace by a Zeotap platform administrator, and is off by default. If you do not see Data Prep in the left sidebar, ask your administrator to enable it. Enabling it also asks for one extra warehouse grant — see Permissions & Grants.
Why it exists
A model is a definition, not a dataset. Its SQL is stored and re-run inside every query that
reads it: every audience estimate, every sync, every orchestration tile, every profile lookup. That
is exactly what you want for a SELECT over a clean table — and exactly what you do not want for
cleaning logic, which then runs again on every one of those queries, forever.
Raw data usually needs that cleaning. A file or API load often lands every column as text; nested values arrive as JSON strings; an append-only load keeps a row per change rather than the current state of a record; event payloads are a single JSON blob.
Before Data Prep the only options were to paste the cleaning into a model — paying for it on every read, and making the model complex enough that reverse ETL had to fall back to comparing whole result sets — or to build tables yourself outside Zeotap.
A prepared table moves that cost to one build. The model over it becomes a plain
SELECT * FROM cdp_prep.customers, which is cheap to read and simple to reason about.
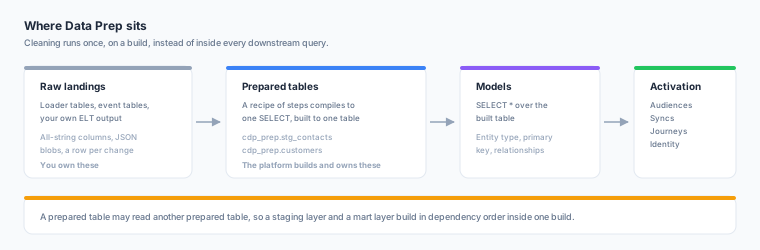
What a prepared table is
| Part | Meaning |
|---|---|
| Prepared table | A real table Zeotap creates and rebuilds in your warehouse, in a schema called cdp_prep |
| Recipe | The definition: one primary input plus an ordered list of steps. It compiles to a single SELECT |
| Step | One operation — cast these columns, flatten this JSON, keep the latest row per key, join this lookup, or a SELECT you write yourself |
| Build | One run that rebuilds the table, or applies only what is new to it |
| Blueprint | A ready-made set of prepared tables, models and relationships for a known connector |
You never write CREATE, MERGE, DELETE or any other statement that changes a table. Every step is
a SELECT, and Zeotap generates everything else — which is why Data Prep can only ever write
into cdp_prep, and never into your own schemas.
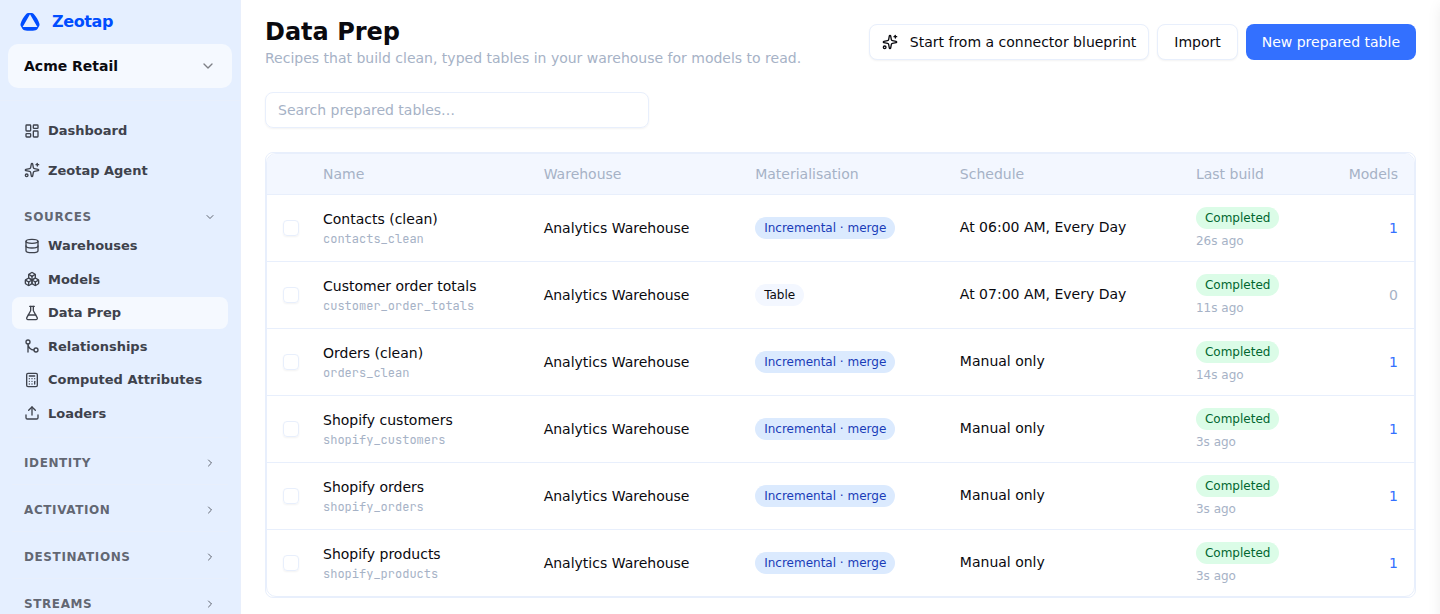
Every prepared table in a workspace is listed under Data Prep, with how it is built, when it builds itself, what its last build did and how many models read it.
How you get one
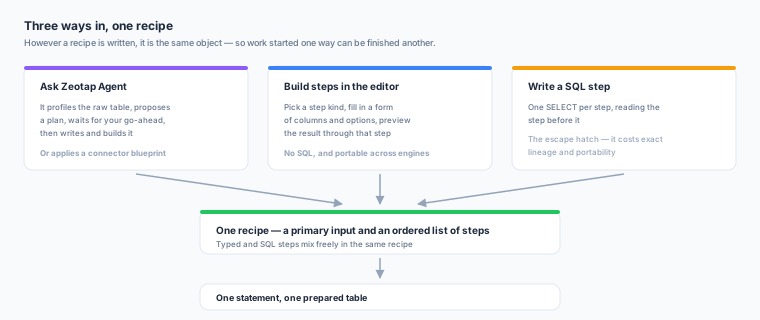
There are three ways in, and they all produce the same object, so work started one way can be finished another:
- Apply a connector blueprint. If the raw tables came from a Zeotap loader for Shopify, HubSpot, Salesforce, Stripe, Klaviyo or GA4, one click creates the prepared tables, the models over them and the relationships between those models. See Connector Blueprints.
- Ask Zeotap Agent. It profiles the raw table, proposes a plan in plain language, waits for your go-ahead, then writes the recipe, validates it, previews it and builds it. See Data Prep with Zeotap Agent.
- Build it yourself in the editor — a step at a time with forms, or with SQL where you prefer it. See Recipes & Steps.
Creating a prepared table
The editor has three steps — Source, Recipe and Build settings — and they split by how often you come back to them. The recipe is what you iterate on; build settings are set once and left alone. You can move between them freely, and Save works from either of the last two.
- Navigate to Data Prep in the left sidebar and click New prepared table.
- Source. Choose the warehouse the table is built in. A recipe can only reference tables inside it.
- Recipe. Give the table a name — the slug derived from it is the physical table name and how other recipes refer to it, so it is fixed once the table has been built for the first time. Choose the Input, the table this recipe is mainly about, then add steps. The panel beside the steps holds Profile, Preview and Validation, so you can measure the input, run the recipe through any step, and read what Zeotap made of it without leaving the steps. Start with Profile — opening it measures the table this recipe reads.
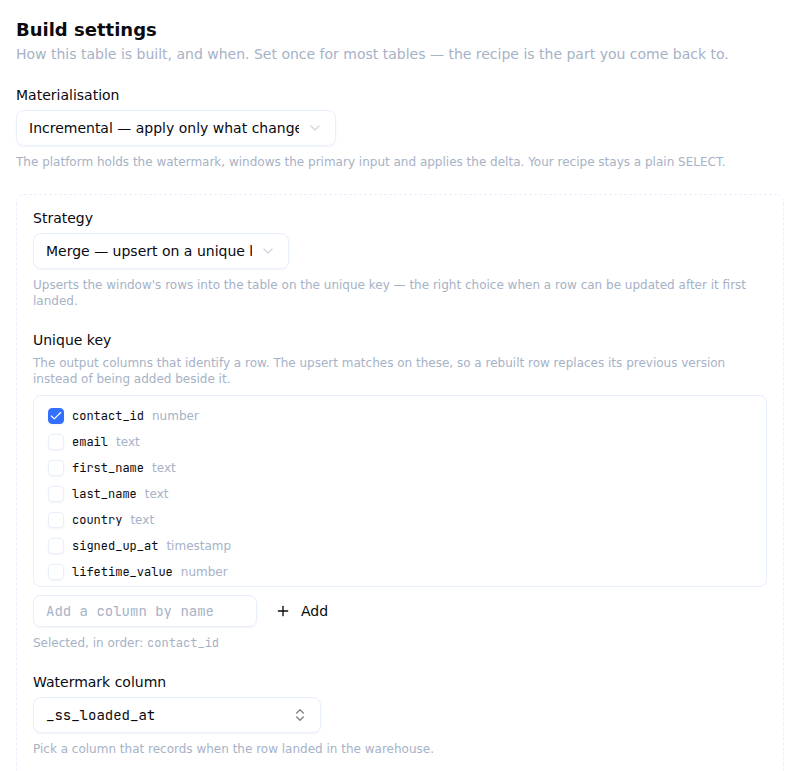
- Build settings. Choose the Materialisation — rebuild the whole table every time, or build it incrementally — and decide when it builds: on a schedule, when its inputs change, or both. See Triggers & Freshness.
- Save, then Build.
- Create a model over the result, from the prepared table’s own page.
What a build guarantees
- Publication is atomic. A full rebuild is written to a staged copy and swapped in, so once a first build has succeeded nothing that reads the table ever sees it empty or missing.
- A failed build leaves the old data in place. The table stays correct and simply stops being fresh; tables downstream of a failure are skipped rather than built from stale inputs.
- Bad data can refuse to publish. Declare data tests and a
failure at
errorseverity keeps the previous contents rather than replacing them. - Order is handled for you. One prepared table may read another; a build runs a whole chain in dependency order.
Supported warehouses
Snowflake, BigQuery, Databricks and ClickHouse.
Redshift and Spark lakehouse sources are not yet supported, and Zeotap refuses to create a prepared table on one rather than creating a table it cannot maintain. See the FAQ.
Next steps
- Recipes & Steps — every step kind and its options
- Incremental Builds — processing only what is new
- Profiling & Suggestions — what is actually in a raw table
- Permissions & Grants — who can do what, and what your warehouse needs