Creating a Model
This guide walks you through creating a model in Zeotap. A model defines a query against your warehouse that produces the data you want to sync to destinations. You can build one visually with the Table Selector, or write the query yourself in the SQL Editor.
Prerequisites
- A configured and healthy Warehouse connection
- Knowledge of the tables and columns available in your warehouse (the Table Selector will browse them for you)
- Appropriate workspace permissions (Admin or Editor role)
Step-by-Step Guide
The create-model wizard has four steps — Select source, Choose mode, Define model and Finalize — shown across the top as you go.
Step 1: Open the Create Model Wizard
- Log in to your Zeotap workspace
- Click Models in the left sidebar
- Click the Create Model button
Step 2: Select a Source
Choose the source (warehouse connection) that contains the data you want to query. The dropdown shows all configured sources with their type and health status.
Only healthy sources (with a successful connection test) are available for model creation.
Step 3: Choose How to Define the Model
Zeotap offers two ways to define what a model returns. Pick one on the create screen:
| Mode | What it does | Use it when |
|---|---|---|
| Table Selector | Pick a schema, table, and columns visually. SQL is generated automatically. | The model is one table, or a subset of its columns |
| SQL Editor | Write a custom SQL query to define your model. Full control over the output. | You need joins, filters, aggregates or expressions |
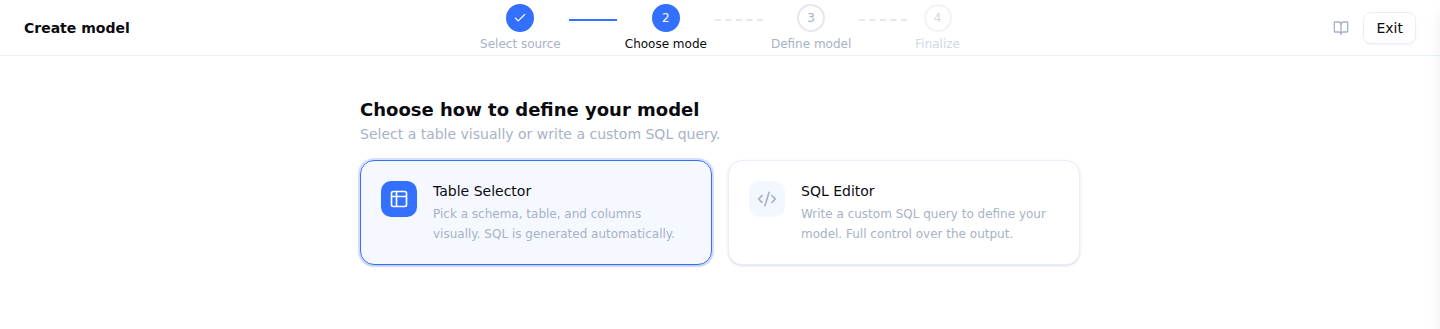
You can start in the Table Selector and move to the SQL Editor later if the model outgrows a single table.
Table Selector
- Choose a schema from the source
- Choose a table within it
- Tick the columns you want the model to return
Zeotap generates the SELECT for you, so there is no SQL to write or maintain. This is the quickest path for a straightforward “sync this table” model.
SQL Editor
Use the SQL Editor to write a query that produces the data you want to sync. The query runs in the SQL dialect of your selected source (Snowflake SQL, BigQuery SQL, etc.).
Basic example — select from a single table:
SELECT
  customer_id,
  email,
  first_name,
  last_name,
  signup_date,
  lifetime_value
FROM customers
WHERE email IS NOT NULL
  AND status = 'active'
Join example — combine data from multiple tables:
SELECT
  c.customer_id,
  c.email,
  c.first_name,
  c.last_name,
  COUNT(o.order_id) AS total_orders,
  SUM(o.amount) AS lifetime_value,
  MAX(o.created_at) AS last_order_date
FROM customers c
LEFT JOIN orders o ON c.customer_id = o.customer_id
WHERE c.email IS NOT NULL
GROUP BY c.customer_id, c.email, c.first_name, c.last_name
CTE example — complex transformation with intermediate steps:
WITH order_stats AS (
  SELECT
    customer_id,
    COUNT(*) AS total_orders,
    SUM(amount) AS lifetime_value,
    MAX(created_at) AS last_order_date,
    MIN(created_at) AS first_order_date
  FROM orders
  WHERE status = 'completed'
  GROUP BY customer_id
),
engagement AS (
  SELECT
    customer_id,
    COUNT(*) AS total_events,
    MAX(event_time) AS last_active
  FROM events
  WHERE event_time >= DATEADD(day, -90, CURRENT_DATE())
  GROUP BY customer_id
)
SELECT
  c.customer_id,
  c.email,
  c.first_name,
  c.last_name,
  c.segment,
  COALESCE(os.total_orders, 0) AS total_orders,
  COALESCE(os.lifetime_value, 0) AS lifetime_value,
  os.last_order_date,
  COALESCE(e.total_events, 0) AS engagement_events,
  e.last_active,
  CASE
    WHEN e.last_active >= DATEADD(day, -30, CURRENT_DATE()) THEN 'active'
    WHEN e.last_active >= DATEADD(day, -90, CURRENT_DATE()) THEN 'at_risk'
    ELSE 'churned'
  END AS engagement_status
FROM customers c
LEFT JOIN order_stats os ON c.customer_id = os.customer_id
LEFT JOIN engagement e ON c.customer_id = e.customer_id
WHERE c.email IS NOT NULL
Step 4: Preview Results
Click the Preview button to run your query and see a sample of the results. The preview:
- Executes your SQL with a
LIMITclause (typically 100 rows) to return results quickly - Shows the column names and data types detected from the result set
- Displays sample values so you can verify the data looks correct
- Reports any SQL errors if the query fails
Use the preview to:
- Verify the query returns the columns you expect
- Check that data types are correct (numbers, dates, text)
- Spot any NULL values or unexpected data
- Confirm row counts are in the expected range
Step 5: Finalize
The last step is where the model gets its identity and its column configuration.
Name and description
Give your model a descriptive name that identifies both the data and the use case:
- “Active Customers” — Describes the data
- “CRM Contact Sync” — Describes the use case
- “High-Value Users for Google Ads” — Describes both
The name must be unique within your workspace.
Column configuration
After a successful preview, the column configuration panel shows all columns returned by your query. For each column, configure:
Column Type:
- Identifier — A column used to match or identify records (e.g.,
email,customer_id,phone). Identifiers are used for record matching in sync destinations. - Attribute — A data column that carries information about the entity (e.g.,
first_name,lifetime_value,segment).
Primary Key:
- Select one or more columns as the primary key. The primary key uniquely identifies each row and is required for upsert and mirror sync modes.
- Common primary keys:
customer_id,email, or a composite key like(account_id, contact_id).
See Column Configuration for the full guide.
Save
Click Save to create the model. The model is now available for use in:
- Reverse ETL — Map model columns to destination fields
- Relationships — Map columns to entity types and relationships
- Activation — Use as a data source for Computed Attributes and Audiences
Using the API
Create a model programmatically:
curl -X POST https://agentic.zeotap.com/api/v1/models \
  -H "Authorization: Bearer $API_TOKEN" \
  -H "Content-Type: application/json" \
  -d '{
    "name": "Active Customers",
    "source_id": "src_abc123",
    "query": "SELECT customer_id, email, first_name, last_name, lifetime_value FROM customers WHERE status = '\''active'\'' AND email IS NOT NULL",
    "columns": [
      {
        "name": "customer_id",
        "type": "identifier",
        "primary_key": true
      },
      {
        "name": "email",
        "type": "identifier",
        "primary_key": false
      },
      {
        "name": "first_name",
        "type": "attribute",
        "primary_key": false
      },
      {
        "name": "last_name",
        "type": "attribute",
        "primary_key": false
      },
      {
        "name": "lifetime_value",
        "type": "attribute",
        "primary_key": false
      }
    ]
  }'
Editing a Model
To update an existing model:
- Navigate to Models in the sidebar
- Click on the model you want to edit
- Modify the SQL query and/or column configuration
- Click Preview to verify the changes
- Click Save
Important considerations when editing:
- Changes take effect on the next sync run — in-progress runs use the previous query
- Adding new columns requires updating the field mapping in any connected syncs
- Removing columns may break connected syncs if those columns are mapped to destination fields
- Changing the primary key affects how syncs identify records for upsert/mirror operations
Deleting a Model
To delete a model:
- Navigate to Models in the sidebar
- Click on the model to delete
- Click Delete (or use the overflow menu)
- Confirm the deletion
Zeotap prevents deletion if the model has active syncs. Remove or reconfigure those syncs first.
Common Patterns
Incremental Data
Select only recently updated records to keep syncs efficient:
SELECT customer_id, email, name, updated_at
FROM customers
WHERE updated_at >= DATEADD(day, -7, CURRENT_DATE())
Deduplication
Remove duplicate records using ROW_NUMBER():
WITH ranked AS (
  SELECT *,
    ROW_NUMBER() OVER (PARTITION BY email ORDER BY updated_at DESC) AS rn
  FROM customers
)
SELECT customer_id, email, name, phone
FROM ranked
WHERE rn = 1
Aggregated Metrics
Roll up transaction data into per-customer metrics:
SELECT
  customer_id,
  COUNT(DISTINCT order_id) AS order_count,
  SUM(amount) AS total_spend,
  AVG(amount) AS avg_order_value,
  DATEDIFF(day, MAX(order_date), CURRENT_DATE()) AS days_since_last_order
FROM orders
GROUP BY customer_id
Cross-Schema Joins
Combine data from different schemas:
SELECT
  c.customer_id,
  c.email,
  s.subscription_status,
  s.plan_name,
  b.total_invoiced
FROM public.customers c
JOIN billing.subscriptions s ON c.customer_id = s.customer_id
JOIN billing.invoice_totals b ON c.customer_id = b.customer_id
Next Steps
- Learn the SQL editor features
- Configure column types
- Create a Reverse ETL sync to activate your model data